
Le CPG Café
Le forum de la team CPG en live sur xbox360
|
| | | Concours la plus belle voiture sur FORZA !!! |  |
| | | Auteur | Message |
|---|
Djtax21
Administrateur


Nombre de messages : 254
Age : 41
Localisation : Dijon
Emploi : Technico-commercial
Loisirs : Informatique, xbox, deejaying
Date d'inscription : 22/03/2007
| Sujet: Concours la plus belle voiture sur FORZA !!!  Sam 16 Juin - 17:27 Sam 16 Juin - 17:27 | |
| Allez je lance un petit concour aux heureux possésseurs de FORZA 2!
Postez ici les clichés de vos petites merveilles (voitures) ...
Et nous voterons pour la plus belle !!!! | |
| | | | La Gl0bule
Administrateur

Nombre de messages : 181
Age : 35
Localisation : chelles 77500
Emploi : Boulanger
Loisirs : Xox 360
Date d'inscription : 23/03/2007
| | Sujet: Re: Concours la plus belle voiture sur FORZA !!! Sam 16 Juin - 23:35 | |
| | |
| | | | La Gl0bule
Administrateur
Nombre de messages : 181
Age : 35
Localisation : chelles 77500
Emploi : Boulanger
Loisirs : Xox 360
Date d'inscription : 23/03/2007
| | Sujet: Re: Concours la plus belle voiture sur FORZA !!! Dim 17 Juin - 2:25 | |
| J'ai envoyé 2 Photos a DJTAX21 pour kil les mettent kar moi je c pas faire.... Un avant gout il y en a encore en prépa... | |
| | | | La Gl0bule
Administrateur
Nombre de messages : 181
Age : 35
Localisation : chelles 77500
Emploi : Boulanger
Loisirs : Xox 360
Date d'inscription : 23/03/2007
| | | | | atklique60
Administrateur
Nombre de messages : 121
Age : 42
Localisation : OISE , Picardie
Emploi : patissier
Loisirs : xbox 360 , tirs
Date d'inscription : 22/03/2007
| | Sujet: Re: Concours la plus belle voiture sur FORZA !!! Dim 17 Juin - 11:14 | |
| moi je vais commencé a en fair et je l'ai posterai le week end prochain  | |
| | | | La Gl0bule
Administrateur
Nombre de messages : 181
Age : 35
Localisation : chelles 77500
Emploi : Boulanger
Loisirs : Xox 360
Date d'inscription : 23/03/2007
| | Sujet: Re: Concours la plus belle voiture sur FORZA !!! Dim 17 Juin - 11:23 | |
| Pk ke le week end prochain???Mdrrrr | |
| | | | atklique60
Administrateur
Nombre de messages : 121
Age : 42
Localisation : OISE , Picardie
Emploi : patissier
Loisirs : xbox 360 , tirs
Date d'inscription : 22/03/2007
| | Sujet: Re: Concours la plus belle voiture sur FORZA !!! Dim 17 Juin - 11:34 | |
| car il y a une tarlouze qui vien chez moi le week end prochain et il prendra son jeu original ( oué car moi je l'ai mais en gravé ) | |
| | | | La Gl0bule
Administrateur
Nombre de messages : 181
Age : 35
Localisation : chelles 77500
Emploi : Boulanger
Loisirs : Xox 360
Date d'inscription : 23/03/2007
| | Sujet: voitures la globule Dim 17 Juin - 22:38 | |
| | |
| | | | Djtax21
Administrateur
Nombre de messages : 254
Age : 41
Localisation : Dijon
Emploi : Technico-commercial
Loisirs : Informatique, xbox, deejaying
Date d'inscription : 22/03/2007
| | Sujet: Re: Concours la plus belle voiture sur FORZA !!! Lun 18 Juin - 0:24 | |
| | |
| | | | La Gl0bule
Administrateur
Nombre de messages : 181
Age : 35
Localisation : chelles 77500
Emploi : Boulanger
Loisirs : Xox 360
Date d'inscription : 23/03/2007
| | Sujet: Re: Concours la plus belle voiture sur FORZA !!! Lun 18 Juin - 9:44 | |
| Pas mal DJ mais on c'est ki va gagner pour le concours bibi mdrrrrr lool bon kan tu ve pour une course a+ l'ékipe | |
| | | | Djtax21
Administrateur
Nombre de messages : 254
Age : 41
Localisation : Dijon
Emploi : Technico-commercial
Loisirs : Informatique, xbox, deejaying
Date d'inscription : 22/03/2007
| | Sujet: Re: Concours la plus belle voiture sur FORZA !!! Mer 20 Juin - 13:24 | |
| | |
| | | | Djtax21
Administrateur
Nombre de messages : 254
Age : 41
Localisation : Dijon
Emploi : Technico-commercial
Loisirs : Informatique, xbox, deejaying
Date d'inscription : 22/03/2007
| | Sujet: Re: Concours la plus belle voiture sur FORZA !!! Mer 20 Juin - 16:28 | |
| | |
| | | | atklique60
Administrateur
Nombre de messages : 121
Age : 42
Localisation : OISE , Picardie
Emploi : patissier
Loisirs : xbox 360 , tirs
Date d'inscription : 22/03/2007
| | Sujet: Re: Concours la plus belle voiture sur FORZA !!! Mer 20 Juin - 21:33 | |
| | |
| | | | spidou
Chef des Armées


Nombre de messages : 187
Age : 40
Localisation : corbeil
Emploi : ubisoft séction "creation live"
Loisirs : djing,xbox,et fumééé et boire ^^
Date d'inscription : 22/03/2007
| | Sujet: Re: Concours la plus belle voiture sur FORZA !!! Jeu 21 Juin - 1:00 | |
| put1 pa mal cmt tu fer pour les prendre les tof de ta caisse? | |
| | | | atklique60
Administrateur
Nombre de messages : 121
Age : 42
Localisation : OISE , Picardie
Emploi : patissier
Loisirs : xbox 360 , tirs
Date d'inscription : 22/03/2007
| | Sujet: Re: Concours la plus belle voiture sur FORZA !!! Jeu 21 Juin - 9:30 | |
| tu prend en foto ta voiture et tu l'envoi sur le site de forza et apres tu a plus qu a alé sur le site pour les récupéré | |
| | | | atklique60
Administrateur
Nombre de messages : 121
Age : 42
Localisation : OISE , Picardie
Emploi : patissier
Loisirs : xbox 360 , tirs
Date d'inscription : 22/03/2007
| | Sujet: Re: Concours la plus belle voiture sur FORZA !!! Jeu 21 Juin - 11:59 | |
| | |
| | | | Djtax21
Administrateur
Nombre de messages : 254
Age : 41
Localisation : Dijon
Emploi : Technico-commercial
Loisirs : Informatique, xbox, deejaying
Date d'inscription : 22/03/2007
| | Sujet: Re: Concours la plus belle voiture sur FORZA !!! Jeu 21 Juin - 13:44 | |
| Un seul mot ....
MAGNIFICA | |
| | | | atklique60
Administrateur
Nombre de messages : 121
Age : 42
Localisation : OISE , Picardie
Emploi : patissier
Loisirs : xbox 360 , tirs
Date d'inscription : 22/03/2007
| | Sujet: Re: Concours la plus belle voiture sur FORZA !!! Jeu 21 Juin - 15:34 | |
| | |
| | | | La Gl0bule
Administrateur
Nombre de messages : 181
Age : 35
Localisation : chelles 77500
Emploi : Boulanger
Loisirs : Xox 360
Date d'inscription : 23/03/2007
| | Sujet: Re: Concours la plus belle voiture sur FORZA !!! Jeu 21 Juin - 15:55 | |
| | |
| | | | Djtax21
Administrateur
Nombre de messages : 254
Age : 41
Localisation : Dijon
Emploi : Technico-commercial
Loisirs : Informatique, xbox, deejaying
Date d'inscription : 22/03/2007
| | Sujet: LE TUTO Jeu 21 Juin - 16:38 | |
| This tutorial is for everyone who wants to learn how to make custom GFX and designs. I will assume if you are reading this, then youve at least messed around with the Livery editor, so you know all the basic shapes, and how to change colors and stretch and skew. If you dont, just practice with it, you'll learn quickly enough. (I apologize about the resolution of some of these pics, i used my camera phone) First of all, you need to know that you can't upload pics to the game.All of the designs you see are hand made using the in-game livery editor. But its not too complicated to make graphics using it, and like anything else in life, the more you practice with it, the better you will be.
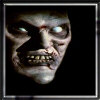
For this tutorial, i will be making a graphic of Harley Quinn, the Joker's sidekick in the Batman series:

Before you even get started with the game, if you are using a picture (as opposed to drawing free hand with nothing but your imagination to go off of), sketch out a simple plan of attack...basically draw up what shapes you will need, basic shapes. You dont have to get complicated, just make sure the angles and proportions are correct. When you sketch it out, it should look something like this:

Notice how i only used basic circles, ovals, squares and triangles. This will come in handy once you get into the livery editor, since you have to use those shapes.
Now, you dont have to draw the design on the car you want to place it on, in fact, sometimes this makes things more difficult since some cars have odd shaped roofs, hoods, and side panels. Its best to use a blank canvas like the Mini Cooper roof, which is large and square. After you finish your design, you can save it to your design catalog and then place it, resize it, and spin it on any car you wish. For this tutorial, i am painting on the roof of the Nissan Skyline GT350
Also, when you use a blank canvas, paint the car a color that wont blend with your design, because it will be hard to keep track of shapes if they are hidden because they match the same color as the car. For this example, i know that the main 3 colors are Red, Black and White, so i chose to paint the car a champagne color. (after you finish a graphic, you can always go back and repaint the car whatever color you wish)
Now that you have your basic sketch, and you selected your canvas and canvas color, we can begin placing basic shapes. You dont have to be super accurate here, because its just the base design that you will be working off of. Just make sure you pay attention to angles and proportions. Those should be as accurate as possible.
If you know a certain section of your design is going to be intricate, you can always do that portion first as large as possible, save it, then resize it to fit the overall design. in this case, i notice the head is the most complicated portion to do because of the fine detail, so i am opting to do the first, as large as possible, then i will save it, and add it to the body to finish the design. After placing the basic shapes, i get a rough outline of the head:

I painted the shapes different colors to show that you dont neccesarily need alot of shapes when making the outline, save the details for later.
But now i want to make them all the same color, so i go into the livery editor and select the "Highlight all Layers" option. this will highlight ALL the layers on the current side of the vehicle:

Now that all the Layers are highlighted, look on the bottom of the screen and you will see all your options, if you hold down the left thumbstick, a different set of options appear:

You can de-select all the layers by chosing the option in the livery menu, or if you hold down the left thumbstick, you can select only certain layers, so if you wish, you scroll to layer 1, hold the left thumstick and press A, let the thumbstick go, scroll over to layer 8 do the same thing, scroll to layer 12, do the same thing, and then you can manipulate only those 3 layers, and the rest of the layers will stay where they are. You can deselect individual layers by clicking and holding the left thumbstick and pressing A again.
Now that i have all the layers highlighted, i change the color to green, and all the layers are now the same color:
 [size=12]" border="0" /> [size=12]" border="0" />
This is just my rough outline, im not going to try and fill it in piece by piece, it is just here to guide me as i add shapes and detail, and once the graphic is done, i will erase the green outline layers. Now i will start by filling in the red. Remember, this system works of layers, so look at your picture and decide which layers are on the bottom and start from there. In this pic, the red is on bottom, with the black on top of the red, and finally the white face and then black mask. So this is the order i will be adding shapes:
 [size=12]" border="0" /> [size=12]" border="0" />
I continue using different shapes, filling up the red left side of her face, this is the time where you are trying to get it as accurate as possible, at least on the edges:
 [size=12]" border="0" /> [size=12]" border="0" />

Now that i have the red portions filled in, i am going to start filling in the black sections using shapes, using the same method as before. Remember, you have a thousand layers, which is A LOT, so dont be afraid to use more shapes if one isnt quite cutting it:

One helpful thing to remember-after you select your shape, you have to pick its color, at this color selection screen, if you hit the right trigger, it will bring up a list of the previous colors you just used, and this is VERY helpful when you are trying to match colors, since you dont have to play the guessing game and keep changing the color til you get it right:

Now that ive used shapes to fill in the black portions, i can move on to the next layer which is the white face:

Notice how the design doesnt quite match up with my original layout, this is perfectly fine, since the original layout was just a guide. Now since i have the basic shape of the face done, i can delete the green outline layers. I dont have to do it at this point, but i am satisfied with the face, and the only thing left is the interior and then details and shading:

I add some more black shapes to make the mask of the face, and now all the basic layers are done. The only thing remaining is shading and details:

I start with the pompoms on her headress, these are small and quite easy to do. I start with a dark gray circle:

Next, i go into the gradients menu to select a circle gradient and then i make it white, shrink it, and place it on top of the grey circle layer:

Now that that is done, i start shading the red portions of the headdress. You dont have to use gradients to make gradients!! I used the circle gradient for the pompom because it was simple, easy and effective. But the gradients are very limited in their uses. Its best to make a shape with the primitive shapes, then make it black for shades or white for highlights and then adjust the transparency. You can create a gradient effect by layering different shapes with the transparencies. Since this design isnt heavy on shading and lighting, i wont get into that in this tutorial, but i can do it later if anyone is interested. For the design, i select a curved primitive, and make it black, placing it on the top of the red:

Next i simply drop down the transparency:

I continue to work around the red areas, making small areas of shade, its hard to notice them in this picture, but they are there. Shading and lighting is crucial in designs because it makes the images 3D. By using the primitive shapes, and adjusting transparency, you can make all kind of shaded angles. I also add a bit of white, using the same exact process to add highlight to the black portion of the head:

Using primitives for shading instead of gradients is key. Lets say you have a red square. All you need to do is is hold down the left theumbstick, copy that layer, go to the next layer, paste it (now you have 2 layers), and then change the color of the new layer to white or black, and adjust the transparency. Move it around to get it where you want, and presto! you have a shaded square.
Now that i have the shading done on most of the outside, i begin shading the white face. There is a portion on her cheek that is actually a blue-ish color (which is common for shades on pure white), and its small enough and in the shape of a gradient, so i go into the gradient menu, pick it out and make it blue:

You can still adjust the transparency, which is good because most of the time you dont want shades to be TOO overpowering (unless you are going for a Sin City look or something). Now that i add the blue gradient, i make some small yellow half circles for her upper eyelids, and add a small shade just above her eye on the right:

Next i use a couple of curved white shapes to make her eyes, trying to match it as exactly as possible. If you are making a human design, the eyes are very important. They need to be exactly proportioned, or it will be the first thing someone notices as being off. I also add a small triangle for her eyelashes:

Next, i add small blue circles for her pupils, and make a small white circle gradient inside those, and i begin the shading on her nose. I start with a solid black primitive again, and i adjust the transparency:

I continue with the small shading around the nose, and i use dark red curves to add the lips:

I finalize the shading by adding a shape covering most of the face on the right, since it is all in shadow, and i will knock down the transparency again:

Finally, i will add the white collar on the neck, add some shading using the same process, go over it one last time to make sure it all looks good, and now it is done.
Something vey important to remember is to SAVE OFTEN!!I had to learn this the hard way since i was 4 hours into a design (this one as a matter of fact), and then i got booted off of Xbox Live and it immiediately exited the livery editor and went to the main Forza menu. Everything i was working on was lost just like that (and i was about 90% done with the entire graphic, not just the head).
So if you are spending more and more time on your design, just save it to the car every now and then. Its in the menu next to take a photo i believe. This will save any possible headaches of lost work.
Ok, now that you are done with the design, make sure you save it!! You are going to want to the save the entire vinyl group so you can apply it to any car you want. Its in the menu right here:

Just enter a name you will remember so its easy to keep track of your graphics later when you want to apply them.
In this case, i am saving the entire head, so when i work on the body, i can just simply load the head, and then resize it so it fits nicely. The head only took 92 layers, so that means i still have 908 layers for the body or anything else.
But for now, i just have a head, and the finished product looks like this:

I hope this tutorial was helpful. If you want me to continue it with the rest of the project and post the finished result, let me know and i can do that.
Good luck to all the budding artists!!!
Update:
So i finished the car, and im gonna skip over the detailed tutorial stuff, since i pretty much used the same methods as before. I started with another outline of the body, using various shapes, making them green:

Next, i begin to use primitives to fill in the Black areas:

After i get the black areas filled in, i start working on the red:

Once that im satisfied with both the red and black segments, i delete the green outline and begin adding the white cuffs:

Next, i use a couple of white gradients, reduce transparency and add them to the black areas as highlights. I also add the red an black diamonds using triangles, and i use black primitives and reduce transparency to add shade to the hand and fingers:

I then do the same process adding shade to the *** and other arm:

I add shades to the other cuff, and add white primitives, dropping transparency to the gun:

After that is all done, i add the white shapes to the collar, give them shade, and save the entire vinyl group. I shrink it a tad, and then load the previous vinyl group (the head), and line up the head, shrink it to size and it is now all finished:

The only thing left to do is paint the car. I go back and paint the car solid black, the rims black, and tint the windows. I then add large red squares to give the car a big Harley quinn pattern, including diamonds, and i place an enlarged head on each rear fender. I move the entire design to the hood, and put a gradient radiant white star behind her. I add text for her name on the front fenders, and the final car looks like this:

 [/size][/size][/size] | |
| | | | Contenu sponsorisé
| | Sujet: Re: Concours la plus belle voiture sur FORZA !!! | |
| |
| | | | | | Concours la plus belle voiture sur FORZA !!! | |
|
| | Permission de ce forum: | Vous ne pouvez pas répondre aux sujets dans ce forum
| |
| |
| |
|


